How to Import Contacts by Scanning Your Paper Calendar
Learn how to quickly digitise your paper appointment book by taking a photo. Our AI-powered scanner extracts client names, phone numbers, and appointment dates automatically.
Overview
If you've been using a paper diary or appointment book to track your clients, you don't need to manually type everything into Remindlo. Our Scan Calendar feature uses AI to read your handwritten or printed appointments and extract the details automatically.
What You'll Need
Your smartphone or a device with a camera
Your paper calendar or appointment book
Good lighting (natural daylight works best)
Step-by-Step Guide
1. Open the Scan Calendar Feature
Go to Contacts in your dashboard and click the Scan Calendar button at the top of the page.
2. Take a Photo or Upload an Image
You have two options:
Take Photo - Uses your device's camera to capture the calendar page directly
Upload Image - Select an existing photo from your device
Tip: For best results, ensure the text is clearly visible and the image is well-lit. Avoid shadows across the page.
3. Wait for AI Processing
Our AI will analyse the image and extract any appointments it can find. This typically takes 5-15 seconds depending on the complexity of the page.
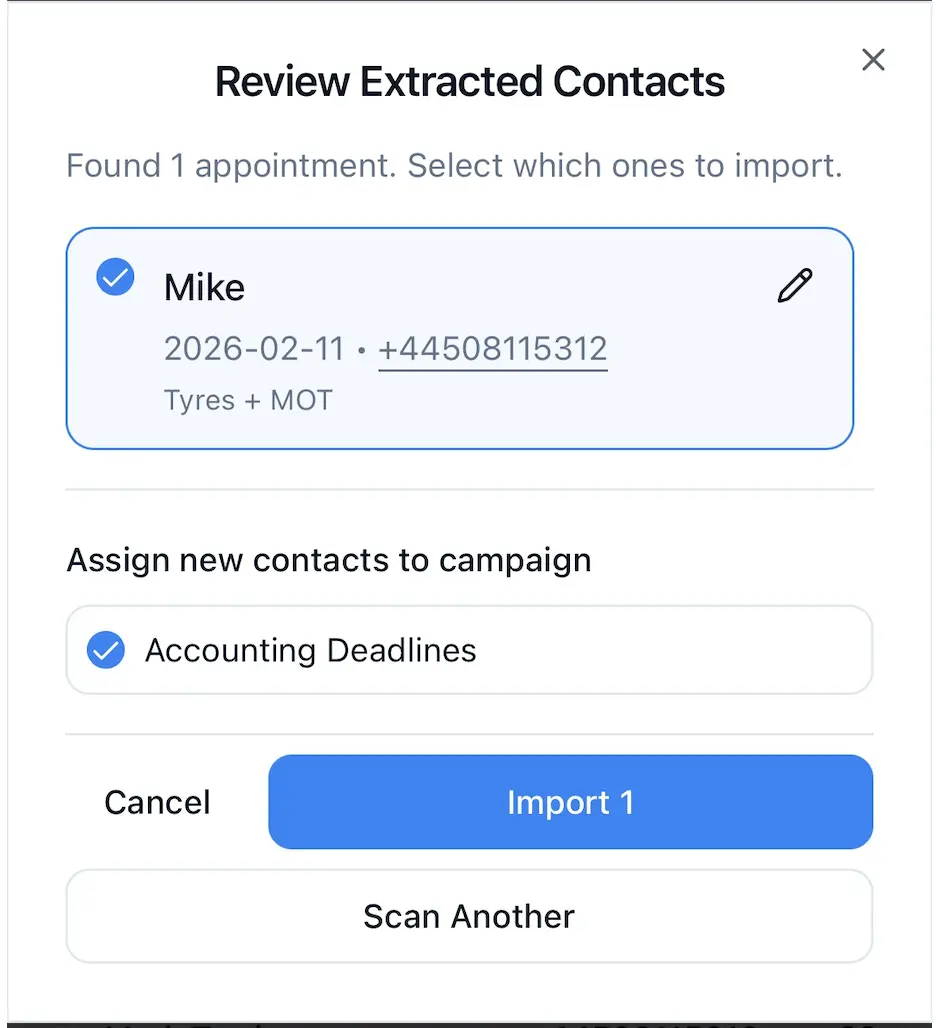
4. Review Extracted Contacts
You'll see a list of all appointments found on the page. Each entry shows:
Client name - As written in your calendar
Date and time - The appointment date and time
Phone number - If visible in the entry
Notes - Any additional text (e.g., "haircut", "full set")
Confidence indicator - Shows how clearly the AI could read each entry, reports if you need to re-take the photo
5. Handle Duplicate Contacts
If the AI finds a name or phone number that matches an existing contact in your database, you'll see a yellow warning. You can choose to:
Update existing - Updates the existing contact with the new appointment date
Create new - Creates a separate contact entry
Skip - Don't import this entry
6. Edit If Needed
Click the pencil icon next to any entry to correct details if the AI misread something. This is especially useful for unusual names or handwriting that's difficult to read.
7. Select and Import
Use the checkboxes to select which contacts you want to import, then click Import. The contacts will be added to your database and can be assigned to campaigns immediately.
Supported Image Formats
JPEG / JPG
PNG
WebP
HEIC (iPhone photos)
Maximum file size: 10MB (images are automatically compressed before processing)
Tips for Best Results
Good lighting - Natural daylight or bright indoor lighting without shadows
Flat surface - Place the calendar flat to avoid distortion
One page at a time - Scan one page per photo for best accuracy
Clear handwriting - The AI works with most handwriting styles, but clearer writing gives better results
Include phone numbers - If you have client phone numbers written next to appointments, the AI will capture those too
What If the Scan Doesn't Work?
If the AI can't read your calendar (poor image quality or unusual format), you'll be shown a manual entry form where you can type the contact details directly. This ensures you can always add contacts even if the automatic scanning isn't successful.
Privacy & Security
Your calendar images are processed securely and are not stored on our servers. The image is analysed, the data is extracted, and then the image is discarded. Only the contact information you choose to import is saved to your account.